-

- Sopto Home
-

- Special Topic
-
- Patch Cord Knowledge
-
- Cleaning Techniques for Pigtails and Patch Cords

Patch Cord Knowledge
- Fiber Optic Connector Ferrule Design
- Fiber Optic Connector Design
- E2000 to ST Fiber Patch Cable Overview
- Acceptable and Unacceptable Fiber Connector End-Face Finishes
- Using Wipes and Cleaning Cassettes to Clean Fiber Patch Cords
- Not-Too-Tight Mating of Fiber Optic Connectors
- Matching Gel and Oils Contamination about Fiber Optic Connectors
- The Effect of Improper Use of Fiber Optic Connectors
- Why Fiber Optic Connectors are Fragile?
SOPTO Special Topic
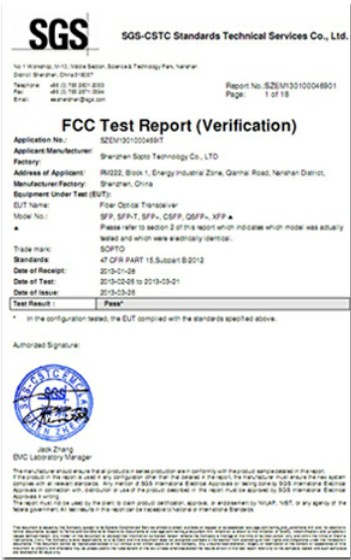
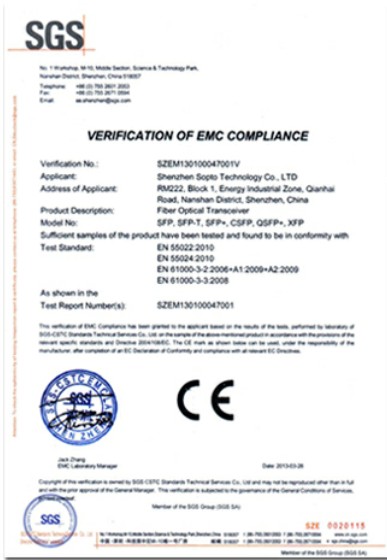
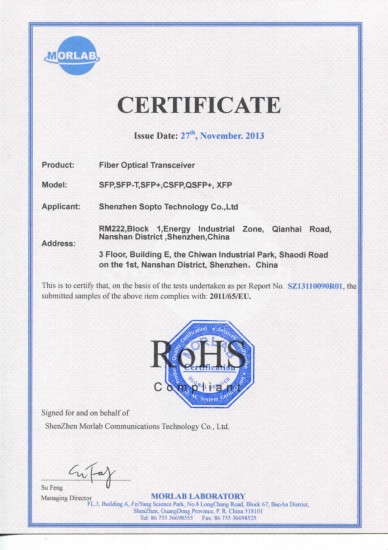
Certificate
Guarantee
Except products belongs to Bargain Shop section, all products are warranted by SOPTO only to purchasers for resale or for use in business or original equipment manufacturer, against defects in workmanship or materials under normal use (consumables, normal tear and wear excluded) for one year after date of purchase from SOPTO, unless otherwise stated...
Return Policies
Defective products will be accepted for exchange, at our discretion, within 14 days from receipt. Buyer might be requested to return the defective products to SOPTO for verification or authorized service location, as SOPTO designated, shipping costs prepaid. .....
Applications
 Fiber Patch Cords have a widely application. Where the need for the optical fiber connection, where you need fiber optic patch cords.
Testing Equipment
FTTX+ LAN
Optical Fiber CATV
Optical Communication System
Telecommunication
SNS Page


SOPTO Products
- Fiber Optic Transceiver Module
- High Speed Cable
- Fiber Optical Cable
- Fiber Optical Patch Cords
- Splitter CWDM DWDM
- PON Solution
- FTTH Box ODF Closure
- PCI-E Network Card
- Network Cables
- Fiber Optical Adapter
- Fiber Optical Attenuator
- Fiber Media Converter
- PDH Multiplexers
- Protocol Converter
- Digital Video Multiplexer
- Fiber Optical Tools
- Compatible
Related Products
Performance Feature
Good Water-proof
Low insertion loss;
low reflection loss;
Stability, good repeatability;
High-precision ceramic ferrule;
Compatible with NTT standard;
Precision Grinding and fully testing;
Compliance with international standards
Patch Cord Knowledge
Recommended


Pigtails and Patch Cords Cleaning Techniques
This section describes cleaning techniques for pigtails and patchcords.
Note: No known cleaning methods are 100% effective; therefore, it is imperative that inspection is included as part of the cleaning process. Improper cleaning can cause damage to the equipment.
- Dry Cleaning Technique: Cartridge and Pocket Style Cleaners
This section describes dry cleaning techniques with the use of cartridge and pocket style cleaners.
Tools
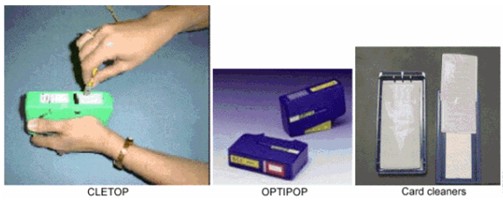
- Cartridge Cleaning Tools: OPTIPOP and CLETOP
- Pocket Style Cleaning Tools: CARDCLEANER
Figure1
Caution: Read the reminders and warnings before you begin this process.
- Make sure that the lasers are turned off before you begin the inspection.
Warning: Invisible laser radiation might be emitted from disconnected fibers or connectors. Do not stare into beams or view directly with optical instruments.
- Remove the protective endcap and store it in a small resealable container.
- Inspect the connector with a fiberscope. See the Connector Inspection Technique section.
-
If the connector is dirty, clean with a cartridge or pocket cleaner.
- For cartridge cleaners, press down and hold the thumb lever. The shutter slides back and exposes a new cleaning area, then go to step 5.
- For pocket cleaners, peel back protective film for one cleaning surface, and then go to step 5.
- For manual advance cleaners, pull on the cleaning material from the bottom of the device until a new strip appears in the cleaning window, and then go to step 5.
-
Hold the fiber tip lightly against the cleaning area.
- For single, non-APC fiber connectors, rotate the fiber once through a quarter turn, 90 degrees.
- For APC connector endfaces, hold cleaning area at the same angle as the endface.
- Pull the fiber tip lightly down the exposed cleaning area in the direction of the arrow or from top to bottom.
Caution: Do not scrub the fiber against the fabric or clean over the same surface more than once. This can potentially contaminate or damage your connector.
- For pocket style cleaners, go to step 8.
- For single fiber connectors with the type A CLETOP, repeat the cleaning process in the second clean slot (step 5 and step 6).
- Release the thumb lever to close the cleaning window, if you use cartridge type cleaners.
- Inspect the connector again with the fiberscope. Refer to the Connector Inspection Technique section.
- Repeat the inspection and cleaning processes, as necessary.
Caution: Throw away any used cleaning material, either cards or material cartridges, after use.
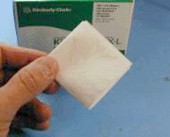
- Dry Clean Technique: Lint-Free Wipes
This section describes dry cleaning techniques that use lint-free wipes.
Tools
- Lint-free wipes, preferably clean room quality.
Figure 2

Caution: Read the reminders and warnings before you begin this process.
- Make sure that the lasers are turned off before you begin the inspection.
Warning: Invisible laser radiation might be emitted from disconnected fibers or connectors. Do not stare into beams or view directly with optical instruments.
- Remove the protective endcap and store it in a small resealable container.
- Fold the wipe into a square about 4 to 8 layers thick, see Figure 2.
- Inspect the connector with a fiberscope. Refer to the Connector Inspection Technique section.
If the connector is dirty, clean it with a lint-free wipe.
Caution: Be careful not to contaminate the cleaning area of the wipe with your hands or on a surface during folding.
- Lightly wipe the ferrule tip in the central portion of the wipe with a figure 2 motion.
Caution: Do not scrub the fiber against the wipe. If you do it, it can cause scratches and more contamination.
- Repeat the figure 8 wiping action on another clean section of the wipe.
- Properly dispose of the wipe.
- Inspect the connector again with the fiberscope.
- Repeat this process as necessary.
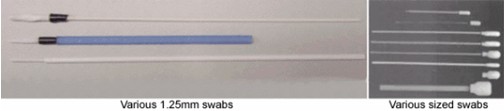
- Dry Clean: Lint-Free Swabs
This section describes dry cleaning techniques that uses lint-free swabs.
Tools
- Lint-free swabs, preferably clean room quality
Figure 3
Caution: Read the reminders and warnings before you begin this process.
- Make sure that the lasers are turned off before you begin the inspection.
Warning: Invisible laser radiation might be emitted from disconnected fibers or connectors. Do not stare into beams or view directly with optical instruments.
- Remove the protective endcap and store it in a small resealable container.
- Inspect the connector with a fiberscope. Refer to the Connector Inspection Technique section.
- If the connector is dirty, clean it with a lint-free swab.
Figure 4
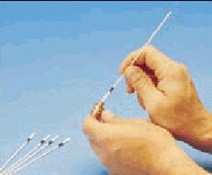
- Lightly press and turn the swab to clean the ferrule face.
- Properly dispose of the swab. Never reuse a swab.
- Inspect the connector again with the fiberscope.
- Repeat this process as necessary.
- Wet Cleaning Technique: Lint-Free Wipes
If a dry cleaning procedure does not remove the dirt from the fiber endface, then try the wet cleaning method.
Caution: Improper cleaning can cause damage to the equipment. The primary concern with the use of isopropyl alcohol is that it can be removed completely from the connector or adapter. Residual liquid alcohol acts as a transport mechanism for loose dirt on the endface. If the alcohol is allowed to evaporate slowly off the ferrule, it can leave residual material on the cladding and fiber core. This is extremely difficult to clean off without another wet cleaning and usually more difficult to remove than the original contaminant. Liquid alcohol can also remain in small crevices or cavities where it can re-emerge during fiber connection.
Tools
- 99% isopropyl alcohol
- Lint-free wipes
Figure 5
Caution: On female multifiber connectors, ensure that no alcohol gets into the guide pin holes. The alcohol might come out during mating and contaminate your connection.
Caution: Do not use wet cleaning on E-2000 or F-3000 connectors because the connector can trap the alcohol and re-contaminate the connector.
Caution: Read the reminders and warnings before you begin this process.
- Make sure that the lasers are turned off before you begin the inspection.
Warning: Invisible laser radiation might be emitted from disconnected fibers or connectors. Do not stare into beams or view directly with optical instruments.
- Remove the protective endcap and store it in a small resealable container.
- Inspect the connector with a fiberscope. Refer to the Connector Inspection Technique section.
- Fold the wipe into a square, about 4 to 8 layers thick. See Figure 5.
- Moisten one section of the wipe with one drop of 99% alcohol. Be sure that a portion of the wipe remains dry.
- Lightly wipe the ferrule tip in the alcohol moistened portion of the wipe with a figure 8 motion. Immediately repeat the figure 8 wiping action on the dry section of wipe to remove any residual alcohol. (See Caution).
Caution: Do not scrub the fiber against the wipe, doing so can cause scratches.
- Properly dispose of the wipe. Never reuse a wipe.
- Inspect the connector again with a fiberscope.
- Repeat the process as necessary.
Related Knowledge: