-

- Sopto Home
-

- Special Topic
-
- Fiber Optics knowledge
-
- Four basic steps to completing a proper fusion splicing and Mech

Fiber Optics knowledge
- Maintained Methods of Fusion Splicer Parts
- How to Use the Fiber Optic Cleaver?
- What are Fixed Attenuators & Variable Attenuators?
- Deployable Fiber Optic Systems for Harsh Mining Environments
- Developing Miniature Fiber Optic Cable Has Become the Trend
- Fiber Optic Cleaning Procedures
- 6 Steps to Selecting a Fiber Optic Cable
- Signal Attenuation Introduction
- How Fiber Transmission Works?
SOPTO Special Topic
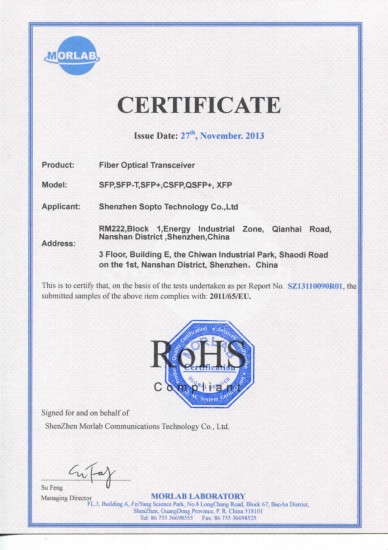
Certificate


Guarantee
Except products belongs to Bargain Shop section, all products are warranted by SOPTO only to purchasers for resale or for use in business or original equipment manufacturer, against defects in workmanship or materials under normal use (consumables, normal tear and wear excluded) for one year after date of purchase from SOPTO, unless otherwise stated...
Return Policies
Defective products will be accepted for exchange, at our discretion, within 14 days from receipt. Buyer might be requested to return the defective products to SOPTO for verification or authorized service location, as SOPTO designated, shipping costs prepaid. .....
Applications
Fiber Optis can be used in so many fields:
Data Storage Equipment
Interconnects,Networking
Gigabit Ethernet
FTTx, HDTV,CATV
Aerospace & Avionics
Data Transfer Tests
Network Equipment
Broadcast Automotive
Electronics,Sensing
Oil & Gas, Imaging
Outside Plant,Central Office
Harsh Environment
Data Transmission
Illumination,Institutions
Ship to Shore,Education
Simulation,Military,Space
Unmanned Aerial Vehicles
Semiconductor Equipment
Diagnostics & Troubleshooting
Premise Networks Carrier Networks
Independent Telecommunication Providers
SNS Page


SOPTO Products
- Fiber Optic Transceiver Module
- High Speed Cable
- Fiber Optical Cable
- Fiber Optical Patch Cords
- Splitter CWDM DWDM
- PON Solution
- FTTH Box ODF Closure
- PCI-E Network Card
- Network Cables
- Fiber Optical Adapter
- Fiber Optical Attenuator
- Fiber Media Converter
- PDH Multiplexers
- Protocol Converter
- Digital Video Multiplexer
- Fiber Optical Tools
- Compatible
Related Products
 10G SFP+ Transceiver
 40G QSFP+ Transceiver
Performance Feature
Fiber Optics knowledge
Recommended
Four basic steps to completing a proper fusion splicing and Mechanical Splicing
Fusion Splicing Steps
As mentioned previously, fusion splicing is a junction of two or more optical fibers that have been permanently affixed by welding them together by an electronic arc.
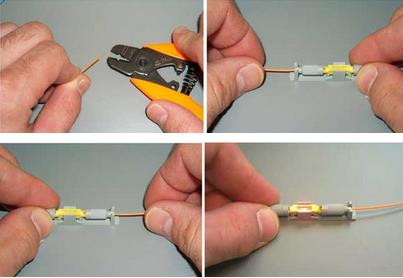
Step 1: Preparing the fiber - Strip the protective coatings, jackets, tubes, strength members, etc. leaving only the bare fiber showing. The main concern here is cleanliness.
Step 2: Cleave the fiber - Using a good fiber cleaver here is essential to a successful fusion splice. The cleaved end must be mirror-smooth and perpendicular to the fiber axis to obtain a proper splice. NOTE: The cleaver does not cut the fiber! It merely nicks the fiber and then pulls or flexes it to cause a clean break. The goal is to produce a cleaved end that is as perfectly perpendicular as possible. That is why a good cleaver for fusion splicing can often cost $1,000 to $3,000. These cleavers can consistently produce a cleave angle of 0.5 degree or less.
Step 3: Fuse the fiber - There are two steps within this step, alignment and heating. Alignment can be manual or automatic depending on what equipment you have. The higher priced equipment you use, the more accurate the alignment becomes. Once properly aligned the fusion splicer unit then uses an electrical arc to melt the fibers, permanently welding the two fiber ends together.
Step 4: Protect the fiber - Protecting the fiber from bending and tensile forces will ensure the splice not break during normal handling. A typical fusion splice has a tensile strength between 0.5 and 1.5lbs and will not break during normal handling but it still requires protection from excessive bending and pulling forces. Using heat shrink tubing, silicone gel and/or mechanical crimp protectors will keep the splice protected from outside elements and breakage.
Mechanical Splicing Steps
Mechanical splicing is an optical junction where the fibers are precisely aligned and held in place by a self-contained assembly, not a permanent bond. This method aligns the two fiber ends to a common centerline, aligning their cores so the light can pass from one fiber to another.
Mechanical Splicing Process
Four steps to performing a mechanical splice:
Step 1: Preparing the fiber - Strip the protective coatings, jackets, tubes, strength members, etc. leaving only the bare fiber showing. The main concern here is cleanliness.
Step 2: Cleave the fiber - The process is identical to the cleaving for fusion splicing but the cleave precision is not as critical.
Step 3: Mechanically join the fibers - There is no heat used in this method. Simply position the fiber ends together inside the mechanical splice unit. The index matching gel inside the mechanical splice apparatus will help couple the light from one fiber end to the other. Older apparatus will have an epoxy rather than the index matching gel holding the cores together.
Step 4: Protect the fiber - the completed mechanical splice provides its own protection for the splice.
For more high quality and low cost fiber optics, please contact SOPTO.
Related Knowledge:
Fiber Optics’ Manufacturing Method
How does a fiber optic cable work?
Quality Control in Optical Fiber Production